For that reason, CPUs use RAM to temporarily store program data. What actually happens is that when you run an application, it first loads all files required to run it on the RAM. This typically means the more RAM a PC has the better it will perform at handling multiple applications simultaneously. As much as you are able to add and upgrade your PC’s RAM, there are limits to how much RAM capacity your PC can take. Also Read:
Is Intel Optane Memory faster than RAM?LPDDR RAM Types: Understanding Mobile Computer Memory
Confirm Before Making The Order
Before you go online and order that 16GB DDR4 RAM, you need to do some compatibility checks. Because, what if your PC is only DDR3 compatible? Now you are $80 deep into a DDR4 RAM stick that will not work on your PC. Sometimes it can also be significantly cheaper to buy a cheaper model PC with a low pre-installed RAM capacity. Which then means you can then upgrade it by adding more RAM to it at a later time. Key to note is that the maximum RAM you can install into your PC depends on a few factors; the motherboard, the CPU, and the Operating System. So, in this post, we will guide you on how to check which RAM is compatible with your PC as well as the maximum capacity you can install. Also Read:
How To Choose RAM Speed For Your ComputerAll You Need To Know Before Your First PC Build
Step 1: Check Installed RAM Capacity and Type Compatible
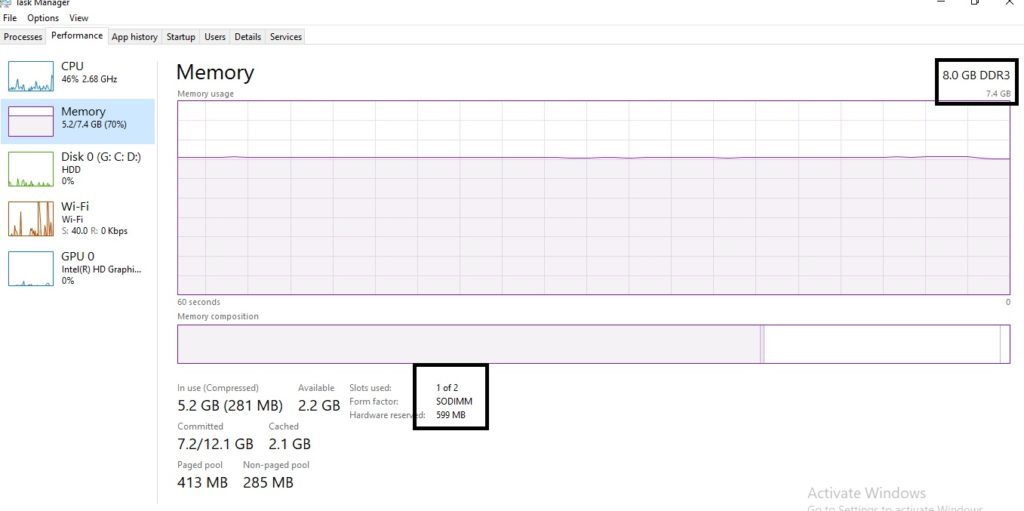
It should go without saying that you need to know how much RAM you already have installed before you decide how much to add. Another critical aspect is to determine the number of RAM slots free for use. For example, if your PC has two RAM slots and both are installed with RAM, for you to upgrade you need to let go of at least one installed RAM stick. So, to get this information we need to open the Task Manager. It is still on the task manager that we will also find out the type of RAM compatible with the system. To do this:
Press the Windows Key on your Keyboard and type Task ManagerThen Open the Task Manager applicationOn the Task Manager application, go to the Performance tabOn the Performance tab click on Memory on the left of your screenYou are now able to see: RAM type, installed capacity, and number of used and free RAM slots
Below is a sample showing a PC compatible with DDR3 RAM type, 8GB installed capacity, one used RAM slot, and one free RAM slot. Also Read:
8GB of DDR4 vs 16GB of DDR3: Deciding between RAM Speed vs more MemoryDo you need more RAM or CPU? Here’s how to tell the difference and what you need
Step 2: Check The Maximum Capacity Your PC can Take Using Command Prompt
At this point, we now need to establish what is the maximum we can add to the PC. Using the example above. If say we find that the maximum that our sample PC can hold is 8GB, unfortunately, there will be no room for an upgrade. But if it can take more like say 12GB or 16GB, it means we can add 4GB or 8GB respectively to the one free RAM slot. To do this:
Press the Windows Key on your keyboard and type CMD.Next, open the command prompt application.In the command prompt type in or copy and paste the command below then press enter.
The Command prompt will now show the maximum RAM capacity that your PC can take in bytes. To convert to gigabytes (GB), divide the figure shown by 1,000,000. For our case below the maximum is 16GB. This means we can upgrade our sample PC below by adding an extra 8GB RAM stick on the unused RAM slot.
Upgrading your RAM is one of the easiest and fastest ways to improve the performance of a slow PC. We hope the above guide can help you bring back to life that old slow PC laptop that has been lying dead in your drawer. If anything is unclear kindly do not hesitate to let us know via the comment section below. Also Read:
Top 5 Things to Consider When Choosing a PC Power SupplyNVMe is Replacing AHCI in PCIe SSDs


